UBI Framebuilding Class - Day 9
5/21/2015 - Day 9

- Final Frame Machining
- Heat distorts tubes - makes them non-round
- Back of HT at top and down tubes
- BB at chainstays
- Need to ream/rethread with special tools
- CAUTION: Use lots of cutting fluid
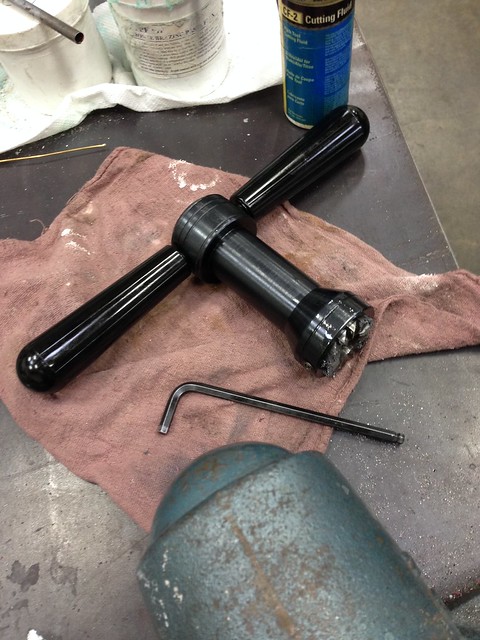
- Seat Tube Reaming
- CAUTION: Turn clockwise only!
- Work over a workbench to protect the cutting tool (in case you drop it)
- Never lay the tool down on a hard surface
- Brush off the chips on the cutter blades
- CAUTION: very sharp teeth/blades!
- Check for burs, remove with file
- Test with a known-good seatpost. If it fits, you don't need to do anything else
- Don't clamp frame by the seat tube, but clamp on TT as close to the working area as possible
- The ST reamer is adjustable: measure diameter of reamer, start at 27.0mm
- Seat tube should be horizontal, which helps prevent the reamer from falling down inside your frame
- Put a rag or bucket on floor under the work area to catch chips and fluid
- Put cutting fluid in ST and on reamer blades
- REMEMBER: turn clockwise only
- Do this step BEFORE cutting the seat tube slot
- Head Tube Chasing and Facing (Park Tools)
- Choose the right size of cutter (1 vs 1-1/8 inch)
- Do top first
- Headtube should be vertical
- Position centering cone at bottom of HT
- Debur both top and bottom of HT
- Install the lower cone and bearing, then the spring, then the locking collar
- Tighten just enough to remove any slop in tool, THEN add two full turns on collar
- CAUTION: only turn tool clockwise
- Adjust by 1/2 turns as needed
- Remove all silver and cut into steel
- Don't push down on the tool
- Examine chips for silver vs. steel
- Turn tool slowly
- Release tension and keep turning before removing the tool to prevent chatter marks
- Check for an even cut across top of head tube (at least 75% around)
- Turn tool with both hands to ensure an even cut
- NOTE: Debur HT after cutting operation
- BB Chasing and Facing
- First drill BB cable guide
- Tap a 5mm hole, use #19 drill bit
- Locate guide with derailleur cable strung from shifter boss to rear cable stop
- Pay extra attention with curved stays to avoid impinging on chainring and/or tire clearance
- Clean out BB; remove flux and dirt and excess silver
- CAUTION: Watch for left and right threading
- CAUTION: Stop if there's any binding
- Turn both sides of tool in same direction to start (top handles towards rear of bike)
- Once there's good purchase, you can focus on one side
- High-pitched squeal means you're cutting into silver
- Continue until cutter is buried in BB shell, plus 1mm
- Remember to reverse tool a quarter turn for each cutting revolution
- Remove non-drive handle
- Replace with facing handle
- Control cutting pressure with 6mm allen key
- Cutter stays in BB shell
- Switch sides - watch center post
- Repeat facing operation
- Replace cutting handle
- Remove cutting tools slowly
- Fork crown facing
- CAREFULLY clamp fork crown in vise with blades facing out away from workbench
- CAUTION: There are two sizes of 1-inch crowns: NJS (27.0mm) or ISO (26.4mm)
- Use Park facing tool
- Cap on top
- Collet inside
- Black for 1 inch
- Blue for 1-1/8 inch
- Tighten cap to center collet
- Put cutting fluid on blades
- Tighten cap to remove any wobble
- CAUTION: only turn tool clockwise
- Feel for a change in cutting action (silver vs. steel)
- Use even downward pressure with both hands
- Check for an even cut (at least 75% around)
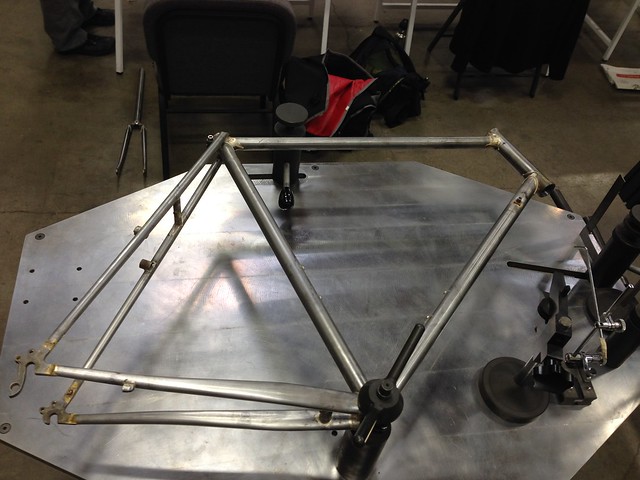
- Alignment Table
- Mount frame onto BB Post
- Check w/Surface Gauge
- ST at BB
- ST at TT
- HT at DT
- HT at TT
- Check w/V-gauge at HT, ST, and rear dropouts
posted by jim g at 9:14 PM
![]()
![]()

0 Comments:
Post a Comment
<< Home