SF Cyclotouring

Ride reports and other ramblings from a San Francisco cyclist.

10/24/2014

Custom is Custom

I just picked up rack project #10 from the powdercoater.

Boom.

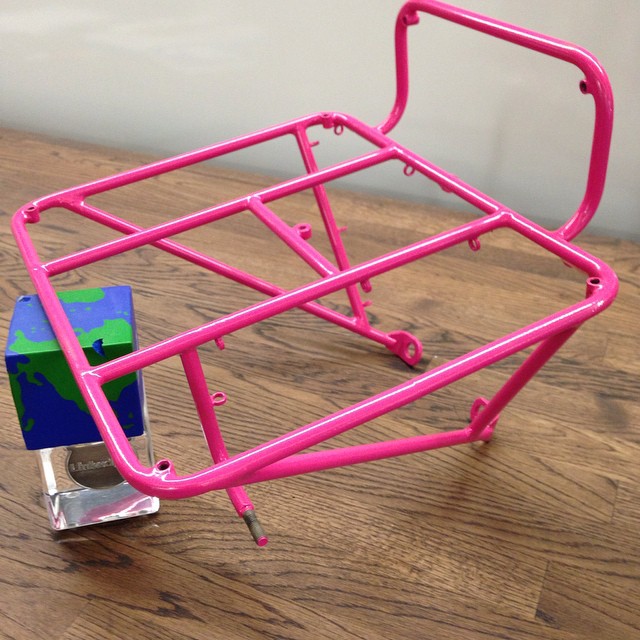
It's a 9x13" demi-porteur designed to fit on a Surly Big-Dummy fork.  It's pink (RAL 4010 to be specific) because that's the color the customer's daughter chose (she rides on the back of said Big Dummy).  Custom is custom!

I'm happy with how the rack turned out.  It's got some unique features, including an offset backstop to clear a Wald basket, six threaded bosses at the corners to bolt down the basket, and light wiring guides for right-side dyno power up and over to a left-side headlamp mount.  Also, since this particular bike uses disk brakes and the cantilever brake studs are unused, this rack bolts directly to the brake stud bases with chunky M10 socket-head bolts.  I had to hand-cut oversized rack tabs to accommodate that.

10/08/2014

A Sort of Frame Repair

A few months back, towards the end of a short weekend tour, the BB on my trusty Trek 400 started creaking with each pedal stroke.  Poking and prodding at the bike, I discovered what looked like a crack on the edge of the downtube-to-bottom-bracket lug:

Crack maybe?

I posted to the Framebuilders' List about this problem, and while most agreed that it wasn't worth it to replace the down tube on this old, off-the-shelf frame, I got some recommendations to try to patch the area.  So that's how I proceeded.

First I stripped the paint off the frame in the affected area.  Then I cut and shaped a triangular patch out of an old chunk of fork steerer tube:

Trek 400 Repair


Next I brazed the patch on as best as I could, trying to make sure that brass filler fully penetrated between the patch and the frame tube, as well as building up a blob of brass across the patch and the lug to strengthen that area:

Frame fix

This was harder than I expected, because the BB shell really sucks up any heat you apply to the lug socket.  You can see the black spots on the patch where the flux got overheated and scorched.  In retrospect, I should've used the largest tip on my torch, instead of the same one I use for rack-building.  However, I posted the results back to the Framebuilders' List, and got some encouraging comments that my repair looked fairly OK.

Then I sanded and primed the repaired area:

Primed


And then painted the area with white spraypaint:

Painted BB reinforcement

The result looks a little blobby up close, but from 6 feet away, you'd never notice it.

Painted


I reassembled the bike with a new cartridge BB since the previous one was starting to feel a little notchy.  So far, the bike's been as good as new, and the creak is gone!  I've since ridden this bike on a couple of mixed-terrain rides, plus another weekend tour, and it seems to work as good as new.


10/06/2014

Oxy/Propane Brazing Torch Equipment

I just realized I never documented the components of my oxygen/propane brazing torch setup.  I spent a lot of time researching this stuff, so I want to post it to hopefully help the next person seeking something similar...

  1. Hoke Jeweler's Torch, Oxy/Propane, with 5 tips ($42.50)
  2. Premier Industries 2300.510 LP regulator ($64.00)
  3. 12' of 1/4" T-grade hoses with B-fittings at one end ($34.00)
  4. Flashback arrestor set ($75.00)
  5. Nellcor Puritan Bennett 590 Oxygen Concentrator (~$250 used)
  6. 20lb propane tank (~$60, or borrow from your BBQ grill)
(Total ~$525)

You can find better, light-weight hoses -- or cheaper prices on similar hoses -- but I didn't want to spend the extra overhead of buying multiple items from multiple vendors.  Premier had the regulator I wanted -- plus everything else -- so I just bought everything from them to keep things simple.  I bought the oxygen-concentrator via my local Craigslist.  I already had the propane tank, but you can get one from someplace like a Blue Rhino tank exchange for about $60.

Setting up